Compiling your own UEFI bios with Secure Boot
It seems that there isn’t really any good guides on how to do this when i did it a while ago.
I struggled alot with understanding and getting everything to work right, so i’m writing one of my own :)
This guide will be a compilation of wiki pages and random things, which i will link in the references section.
Now to get into it,
Setting up
Prerequisites
You will need the following to build OVMF:
- A recent version of GCC
- an IASL compiler (acpica in this case)
Getting EDK II
git clone https://github.com/tianocore/edk2
Setting up the repository
cd edk2
git submodule update --init
Build the BaseTools
make -C BaseTools
. edksetup.sh
Setup the environment
For the compilation to know where everything is we have to indicate where the BaseTools are
export EDK_TOOLS_PATH=$PWD/BaseTools
. edksetup.sh BaseTools
Configuring the build
This is the part where we change the config file so the EDK builds OVMF for us. This config is located in Conf/target.txt
Look for ACTIVE_PLATFORM and change the lines to this:
ACTIVE_PLATFORM = OvmfPkg/OvmfPkgX64.dsc
TARGET = RELEASE
TARGET_ARCH = X64
TOOL_CHAIN_TAG = GCC5
Optionally you can also enable threaded building with MAX_CONCURRENT_THREAD_NUMBER = <Number of threads>
Building OVMF
Now you can just run the following to start building OVMF
build -DSECURE_BOOT_ENABLE -DNETWORK_TLS_ENABLE -DTPM2_ENABLE
(We compile with TPM2 support but i won’t show you how to set this up just yet, that will be for a later tutorial ;)
This will have put the OVMF binaries inside of Build/Ovmfx64/RELEASE_GCC5/FV
Building the hello world
Wait what? The hello world? Yep, that’s right.
If everything is alright the OVMF we have built is capable of Secure Boot, but to verify this we’ll have to be able to test it first. that’s where the HelloWorld from the MdeModulePkg comes in.
to do this we need to do a couple more things.
First we need to edit Conf/target.txt once again changing this:
ACTIVE_PLATFORM = MdeModulePkg/MdeModulePkg.dsc
After that we can build again
build
now our HelloWorld.efi is in Build/MdeModule/RELEASE_GCC5/<Architecture>
(in our case, that’s “X64”)
Installing and configuring OVMF
So, now that we have the code and vars binaries we’ll need to set up a QEMU vm to run everything with and to enroll the custom secure boot configuration. For this we’ll first need to set up some PKI (bleh i know ;) ).
Generating the PK (Platform Key)
openssl req \
  -x509 \
  -newkey rsa:2048 \
  -subj "/CN=<funny ca name> PK/"
  -outform PEM \
  -keyout PK.key \
  -out PK.pem
Getting the OEM string
sed \
  -e 's/^-----BEGIN CERTIFICATE-----$/<Random hex>:/' \
  -e '/^-----END CERTIFICATE-----$/d' \
  PK.pem \
  | tr -d '\n' PK.oemstr
(The random hex is in the format 00000000-0000-0000-0000-000000000000)
Generating the KEK (Key Exchange Key)
openssl req \
  -new \
  -newkey rsa:2048 \
  -outform PEM \
  -keyout KEK.key \
  -out KEK.csr
Now that we have the KEK we need to sign it with our PK:
openssl x509 \
  -req \
  -in KEK.csr \
  -days 365 \
  -CA PK.pem \
  -CAkey PK.key \
  -CAcreateserial \
  -out KEK.pem
Now we both have the PK and the PK-signed KEK. But for EFI to understand this we will have to convert them to the DER format:
openssl x509 \
  -inform PEM \
  -in PK.pem \
  -outform DER \
  -out PK.cer

openssl x509 \
  -inform PEM \
  -in KEK.pem \
  -outform DER \
  -out KEK.cer
Putting everything together
here’s my config to start QEMU:
#!/bin/sh
qemu-system-x86_64 \
  -machine type=pc-q35-2.8 \
  -enable-kvm \
  -net none \
  -smbios type=11,value=<The random hex> \
  -drive if=pflash,format=raw,file=edk2/Build/OvmfX64/RELEASE_GCC5/FV/OVMF.fd
  -drive if=ide,cache=unsafe,format=raw,media=disk,file=efi_disk.bin
You might be wondering, where did efi_disk.bin come from? Well let me explain.
To setup our own Secure Boot keys we will need a copy of them on a FAT formatted disk (FAT because EFI understands that) so we can enroll them into the system.
We can easily create this:
dd if=/dev/zero count=10000 of=efi_disk.bin
mkfs.vfat efi_disk.bin
Now we can mount it and copy over our required files
sudo losetup /dev/loop0 efi_disk.bin
sudo mount /dev/loop0 /mnt/<Folder to mount it on>
sudo cp PK.cer /mnt/folder
sudo cp KEK.cer /mnt/folder

This is roughly what should be in your efi_disk.bin
Now you go to Device Manager -> Secure Boot Configuration and set the secure boot mode to Custom Mode, which gives you the Custom Secure Boot Options menu.
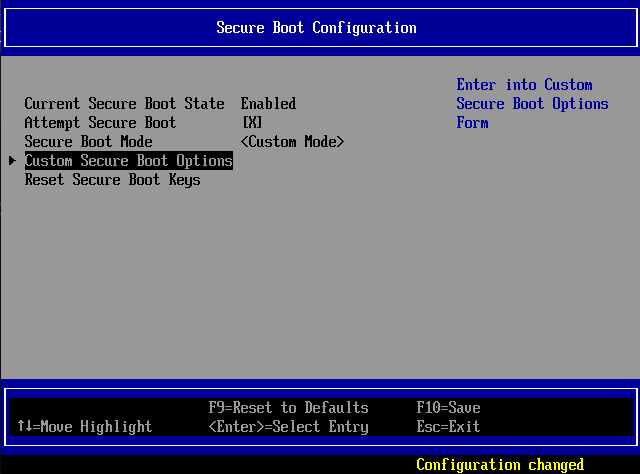
You should see this after setting it to the custom mode
After doing this you can start enrolling the specific keys and signatures in the custom configuration menu.
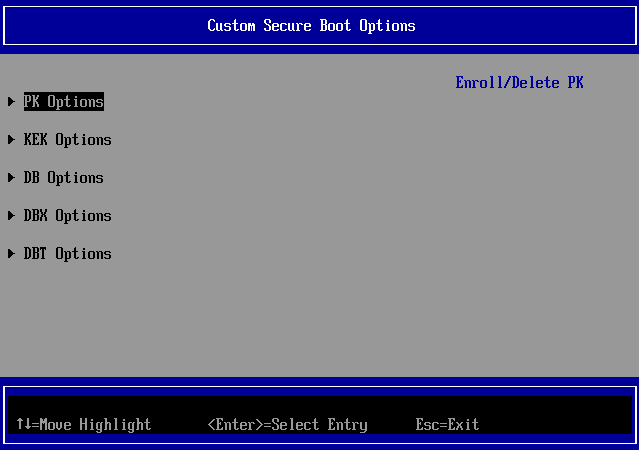
The menu where you can enroll the PK, KEK etc etc.
To allow your binary to run you can either use sbsign to sign your efi binary with the PK/KEK key or you can go to the DB Options menu and simply select the efi binary from the disk and have OVMF enroll the hash for you.
Notes and References
Welcome to The ACPI Component Architecture Project | The ACPI Component Architecture Project. (n.d.). https://acpica.org/
Tianocore. (n.d.-a). Common instructions. GitHub. https://github.com/tianocore/tianocore.github.io/wiki/Common-instructions
Tianocore. (n.d.-b). Getting Started with EDK II. GitHub. https://github.com/tianocore/tianocore.github.io/wiki/Getting-Started-with-EDK-II
Tianocore. (n.d.-c). How to build OVMF. GitHub. https://github.com/tianocore/tianocore.github.io/wiki/How-to-build-OVMF
Signing UEFI Applications and Drivers for UEFI Secure Boot (1.31). (2013). https://raw.githubusercontent.com/tianocore-docs/Docs/master/User_Docs/SigningUefiImages%20-v1dot31.pdf
Rhuefi. (n.d.). qemu-ovmf-secureboot/ovmf-vars-generator at master · rhuefi/qemu-ovmf-secureboot. GitHub. https://github.com/rhuefi/qemu-ovmf-secureboot/blob/master/ovmf-vars-generator
How do you sign a Certificate Signing Request with your Certification Authority? (n.d.). Stack Overflow. https://stackoverflow.com/a/68854352
1747 – RFE: upstream EnrollDefaultKeys.efi to OvmfPkg. (n.d.). https://bugzilla.tianocore.org/show_bug.cgi?id=1747#c2
Tianocore. (n.d.-d). How to run OVMF. GitHub. https://github.com/tianocore/tianocore.github.io/wiki/How-to-run-OVMF